Synclavier Release O Software Documentation
HEADINGS
Hardware
Requirements
General
Enhancements
Using
The Macintosh
Sequence
Editor
Direct-to-Disk™
Hardware Requirements
Different features of Release O require different hardware configurations. Minimum requirements are as a follows
| Feature |
Minimum
Hardware |
| General
requirements | 512K
external memory, Model C processor, superfloppy, graphics terminal, VPK keyboard |
| Macintosh
| Macintosh
II terminal with internal disk drive, color monitor at least 1024x768 resolution,
extended keyboard, trackball |
|
Audio Event Editor |
Direct-To-Disk, 1024K external memory, MG600 or Macintosh,
mouse or trackball |
| Sample-To-Memory
| New STM module |
| 64-Voice Poly Memory |
Factory Upgrade |
Release O Overview
Release O introduces the Mac, 100Khz inputs and the following software module enhancements;
Sequence Editor: Features allow cut and paste to any track, edit note and real-time values, new edit filter, undo. recall and erase commands.
Optical Page: Now remembers current location and the information format. Faster at updating and indexing.
Sound File Editor: Crossfade time increased and improved, new display modes, play both the current and locked sound file.
Sound File Directory: Full screen display of sound files and two memory buttons.
Recorder Display: Several enhancements, including improved Continue command.
Multichannel Display: Redesigned for multiple Poly Bins and D-T-D routing.
Track Display: Redesigned for easier D-T-D output and input routing. Motion control, time display and mark point added.
Sequence Editor: Includes new functions, routing cue lists and setting cuelist volume.
Cue Editor: Optional waveform display, slide edit command. Play and edit cues from new and old terminal keyboard.
Audio Event Editor: Remote control capability
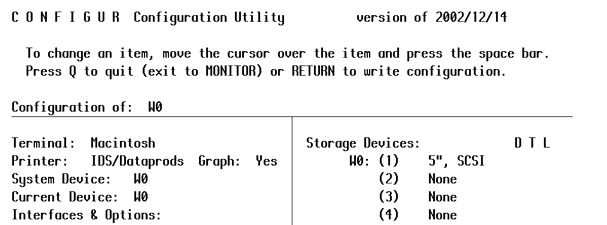
Configur: Updated to include Macintosh and mouse.
General Enhancements
FUNCTION KEYS
now used for cue editing and playback when the Cue Editor panel is open. (Later Releases altered and added to these)
Cue
In | Edit In | Edit
Out | Cue Out | Play
From | Pause | Play
To | Scan/Scrub | ||
F5 | F6 | F7 | F8 | F9 | F10 | F11 | F12 |
SAMPLE-to-MEMORY module (STM).
Now available with Release O for both the Direct-to-Disk and the Synclavier system. Capable of recording at up to 100kHz and with enhanced gain features.
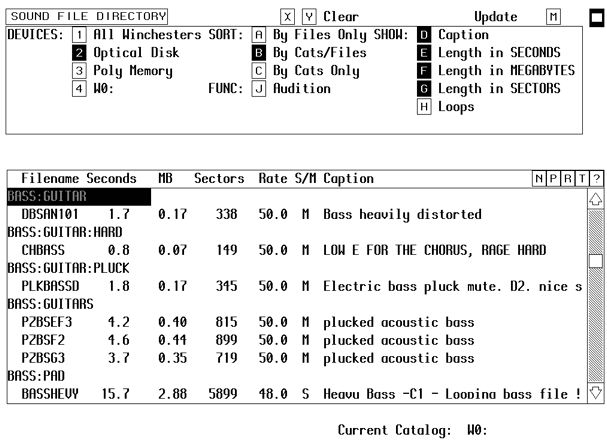
SOUND FILE DIRECTORY (B-Page)
Click or type M to toggle the menu panel on and off.
The menu commands can still be activated while off screen if you select the corresponding letter to the command.
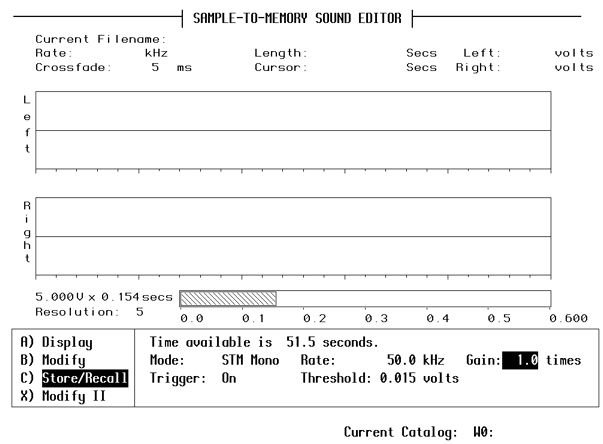
SOUND FILE EDITOR (L-Page): Several new features and enhancements added.
SETTING INPUT GAIN: The new STM module has record and gain settings in the L-Page (see above) for the Synclavier and the P-Page for the Direct-to-Disk. Gain value range is -3dB to +28dB. Default is 1.0 - unity gain.
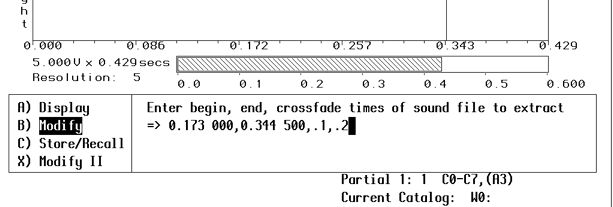
CROSSFADE TIMES: The use of crossfade times ith the DELETE, CUT, COPY, EXTRACT, LOOP and REVERSE LOOP operations has been improved and is now more flexible. The maximum crossfade length is now increased to 65.535 seconds (65,535ms).
Different crossfade times can be set for beginning and end of edit.
1. Select an edit command.
2. To select the default crossfade time, press Return, if not...
3. Type the crossfade length for the beginning of the crossfade in seconds. Hit return or type a comma if you want a different end crossfade time and enter the end crossfade time.
4. If you do not specify a time for the end crossfade the length will be the same as you specify for the start crossfade.
5. Press return to complete the operation.

ZERO LINE: You can now choose to display a zero line. Selecting U toggles this option.
DRAWING MODES: You can select 2 display modes for drawing the sound file on screen. Selection T toggles between the modes.
Line Mode: Connects sample points with a solid line
Dot Mode: Plots one dot for each sample or group of samples depending on the display scale.
COMPARING SOUND FILES: When comparing two mono sound files by placing one in the upper and one in the lower window using the LOCK command, you can now listen to either sound file separately.
The locked sound file can only be played using the trackball or mouse, it cannot be played from any other input device.
RECALLING A SOUND FILE: The entire system is now automatically searched when you recall a sound file either by filename or treename.
If a treename is entered the file is searched for only in the tree area.
If a filename is entered in the RECALL command the following areas are searched in order; Poly memory, Current Catalog, Winchester 0, Winchester 1, Optical Disk.
MARK START and MARK END: When using a modify operation the MARK START and MARK END play markers are preserved during and after the operation.
MAX TIME: For use in multiple Poly Bin systems for moving sounds between bins. The operation shuffles both bins to free up space and as many files as will fit are moved from the first to the second bin.
VERIFY: The COLLECT, MAX TIME, and PRINT commands now ask you to verify the operation by typing OK. This prevents activating a time consuming command accidently.
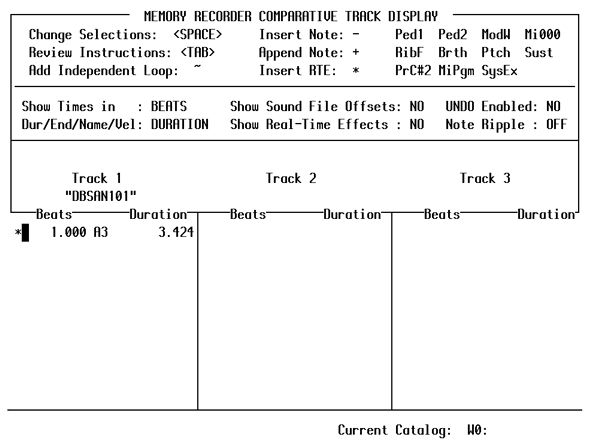
RECORDER DISPLAY (G-Page)
The TIME FIELD has been expandedto include FEET:FRAMES as a selection. The default time is MEASURES (NB Measures are also known as Bars outside of USA)
CTRL-C continues playing the sequence from the current screen cursor position, not the song pointer position.
SEQUENCER ENHANCEMENTS:
NEW FREQUENCY TABLE:
The frequency resolution and accuracy of the polyphonic sampling voices has been greatly improved. The choice exists to use the old frequency table for new and existing sequences, or you can use the improved table.
New sequences automatically use the new frequency table, and old sequences use the original frequency table unless otherwise specified.Press START plus PITCH CLASS on the keyboard to select the NEW frequency table
Press STOP plus PITCH CLASS on the keyboard to select the OLD frequency table The choice is stored in the sequence when you save it and automatically set when recalled.
DISABLING AN INDEPENDENT LOOP
While a sequence is playing press START LOOP plus STOP to ignore the independent loop and continue playing.
MONITOR ENHANCEMENTS
CONFIGUR: New option to select Macintosh Terminal running NEDStartup software.
USING THE MACINTOSH TERMINAL
SCREEN SWITCHES
Some RTP displays contain 'rolling' switches.
1. On rolling switches roll the trackball left and right while holding down the trackball button and a series of options will appear. The selection is made upon release of the button.
2. Hold down the COMMAND key while you click on a switch to step forward through options.
3. Hold down the OPTION key while you click on a switch to step backwards through options.
CLICK - INCREMENTING NUMERICAL VALUES
Hold down the COMMAND key while clicking on a number or segment of a number (one time field in SMPTE for example) to increment the number.
Holding down the OPTION key while clicking decrements the number.
(One of the most useful shortcuts to remember on a Synclavier. SJH)
TAB SELECT NUMBERS
Click on a number and hit TAB to step through the time fields until you highlight the one you wish to alter.
Type in the new value and hit return or TAB to move to the next time field.
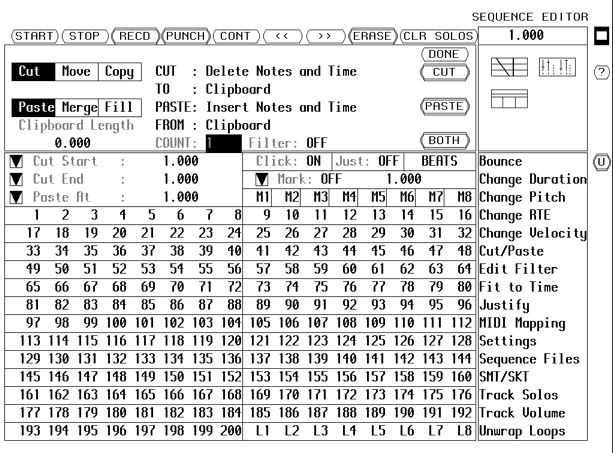
SEQUENCE EDITOR ENHANCEMENTS
SEQUENCE EDITOR DISPLAY (Page - S)
NEW FEATURES
The Sequence Editor now allows you to CUT and PASTE to any track in any sequence. You can change note pitches, durations, velocity and all real-time effects values in the whole sequence or in only a selected segment. An EDIT FILTER filters designated pitches, durations and real-time effects values when making changes.
Complete sequence file management - saving, erasing, and recalling sequences from any catalog in the system - can be done from the Sequence Editor.
You can move directly between the Sequence Editor (S-Page) and the Recorder Display (P-Page). Click on the icon in the top right or faster still just hit TAB.
You can also undo editing or toggle between the last and next to last version of an edited sequence using the button marked 'U'
The INFO button - marked '?' now matches the keyboard INFO button operation.
MARK POINT: You can now use the starting time of the first note on any track as the mark point.
Set the MARK ON/OFF switch to TRK. Then click on the desired track number.
The start time of the first not now determines the sequence start time.
(Equivalent to the VPK keyboard TRACK+MARK button sequence).TIME VALUES: The current time of the sequencer is shown in the time display at the upper right hand corner of the Sequence Editor. Other time display fields appear in the LOCATOR PANEL.
The time in all these fields can be displayed in any of several different formats;Seconds
Minutes
Beats
Measures and Beats
SMPTE
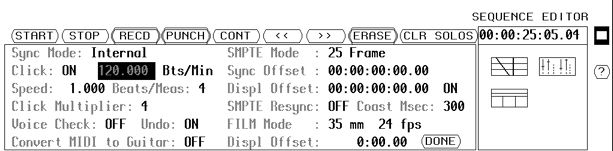
Feet and FramesTo change the TIME DISPLAY FORMAT step or scroll the switch through the different formats. The current time at the upper right of the screen and all the time fields in the LOCATOR PANEL change to the new format. SMPTE time code is displayed in non-drop mode (30 frames per second) by default.
To change to other SMPTE modes (eg drop-frame, 25 or 24 frames per second) Select SETTINGS Set SMPTE to the desired mode from the selection
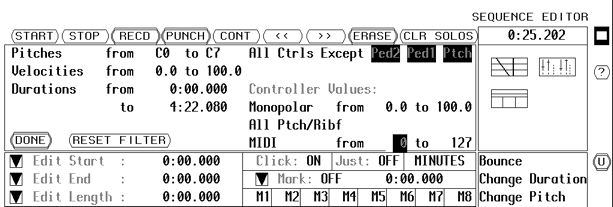
EDIT FILTER:
When executing certain editing commands, you can use the Edit Filter to define pitches, durations or real-time effects to be affected by the editing.
For example, if the loudness of a timbre is controlled by velocity, you can increase the volume of only the softest notes in a passage by setting the EDIT FILTER so that the CHANGE VELOCITY command affects only those notes with velocity values below a certain level.
The EDIT FILTER works with the following commands;
Change Duration
Change Velocity
Cut
TransposeThe FILTER affects;
Pitch
Velocity
Duration
Mod Wheel
Pressure
Pedal 1
Pedal 2
Breath Controller
Midi
Ribbon ControllerSETTING THE EDIT FILTER
Click on EDIT FILTER
Step and scroll each of the items in the Dialog Panel to view the available options.
Type in Values as needed or step the higher or lower.
Click RESET FILTER at any time to reset the filters to their default values.
When finished click DONE. The filter settings are stored for use when an editing command is executed.
CHANGE DURATION:
You can adjust the durations (LENGTH) of all the notes or sounds of any selected track or region.
You can set the duration of each note in the selected region to a single value, or you can scale the notes longer or shorter.
You can add a value to each note, or you can assign increasing or decreasing values throughout the region. Values are displayed in the selected time display format.1. Select a region for change by setting Start and End times.
2. Solo the track(s) to be changed
3. Click on CHANGE DURATION
4. Step to the desired selection in the Duration change field as shown above.
5. Set the values by typing them in or stepping each up or down.
6. Set the minimum and/or maximum values if desired.
7. If you want to use the EDIT FILTER, toggle the FILTER switch ON or OFF
8. Click the CHANGE DUR. button at the lower left of the dialog panel or CANCEL to quit.
If a minimum value is set, all notes with lower values are raised to the minimum. If a maximum value is set, all notes with greater values are reduced to the maximum.
CHANGE DURATION OPTIONS
Set durations to ... All values set to the same value.
Scale Durations by ... A percentage value with option of lower and upper limit.
Add to current value ... Add a value to all notes with minimum and maximum limits.
Slope From ... To ... Increasing or decreasing values between the two chosen limits
The same procedure applies to all other controllers and RTEs.
MEMORY LOCATIONS:An example of the filter in use.
Drag any time field and drop it on any box from M1 to M8.
The time is stored in the memory location until the machine is turned or until an alternative time is dragged and dropped replacing the current time.
To restore the time drag the box M1 to M8 and drop it on the field you wish to change.
CUT/PASTE
When cutting and pasting, you can now paste the notes of any track to any other track. That is, you can cut a section of one track, placing the notes on the clipboard or in a designated file, and then paste that section onto another track of the same or a DIFFERENT sequence.
Before you execute the PASTE, FILL or MERGE command you must solo a destination track or tracks.
If you solo more tracks than you cut, the additional tracks are filled by repeating part or all of the paste beginning with the first track.
If you solo fewer tracks than you cut, only the soloed tracks are filled, and the additional tracks in the clipboard or file are ignored.
FIT TO TIME
You can expand or compress any section of the current sequence to fit a designated length of time. You can leave the durations of the individual sounds or notes unchanged, letting them overlap if the sequence is compressed or inserting silence between them if the sequence is expanded. Or you can choose to have them scaled to match the time adjustment.
When you use this feature, the starting times of all notes in the selected region are adjusted. However, the click of the internal digital metronome remains at it's original setting and speed.
TOP TIP: Before beginning a FIT-TO-TIME operation, you should create a click track of quarter temp notes justified to the original beat. (See 'Meter, Time and Tempo' in the Memory Recorder manual. The clicks of this surrogate click track are affected by the FIT-To-TIME operation thus generating a click track that remains accurate to the tempo change.
1. Select a region by setting the Start and End times in the Edit Window.
2. Click on FIT TO TIME
3. Enter a new END TIME, a new REGION LENGTH, or a PERCENTAGE scale value.
4. To scale the durations of the notes to match the adjustment toggle the SCALE DURATIONS button to YES. Leaving it at NO leaves durations unchanged.
5. If you want a gradual change (ACCELERANDO or RITARDANDO) toggle FIT INSTANTLY to FIT GRADUALLY.
6. If you want the new tempo to continue beyond the selected region toggle the STAY AT NEW SPEED button to YES. (NO leaves it as it was before)
7. Click FIT TO TIME to perform the operation.
8. If if all goes horribly wrong, click on UNDO.
SEQUENCE FILE MANAGEMENT
Click on SEQUENCE FILES. A panel opens enabling you to name, store, recall, rename, delete etc. your sequence files.
[SEQ #1] to [SEQ #8] represents your keyboard sequence 'buckets' .
There is no longer the limit to the size of pre-existing sequence files when saving from the S Page, but pre-existing sequence files ('buckets') must be of adequate size when saving from the VPK keyboard.
NB: 'Buckets' are temporary or SCRATCH sequence storage areas for fast save while working.You may tree climb when recalling and saving sequences. eg. W0:MYSEQ:MUSIC1 for a sequence named MUSIC1 stored in a sub-catalog named MYSEQ which is itself stored on Winchester 0.
Direct-to-Disk™
The Direct-to-Disk section will be completed at a later date.
![]()